Notions-Drye Goods Studio Diary

Thanks for checking in. I am a fiber artist. My current emphasis is on eco printing and other wildcraft with a touch of up-cycling thrown in. You can also catch up with me on Facebook at Drye Goods Studio.
Showing posts with label scarves. Show all posts

Thursday, January 16, 2025

The Studio in Winter

 " A vision without execution is hallucination."

Accredited to Thomas Edison or being an ancient Japanese proverb. It's a good thought either way.

So, at this time of year I am not only wrapping up the old year (inventory, taxes etc.) but planning what  this year will look like. With everything that is going on the vision is pretty cloudy to be honest. I am thinking about what art fairs I will do, classes I will teach, and what art I will make. The only thing set in stone at this point is a solo exhibit at Pottery Place Plus, of which I am a member. We can rent out the guest artist space for a body of work that differs from our normal work we show in the gallery. I am thinking smaller accessories that may drift into some jewelry items, but we will see. My method for deciding is to make piles of materials and see what ideas come of it. A great activity for cold, gray afternoons. I watch the goings-on at the bird feeder while I sort out the fabrics that remind me of the sunny days they were made. I have until October to be done with the work for the show; It seems far off, but will be here shortly. 

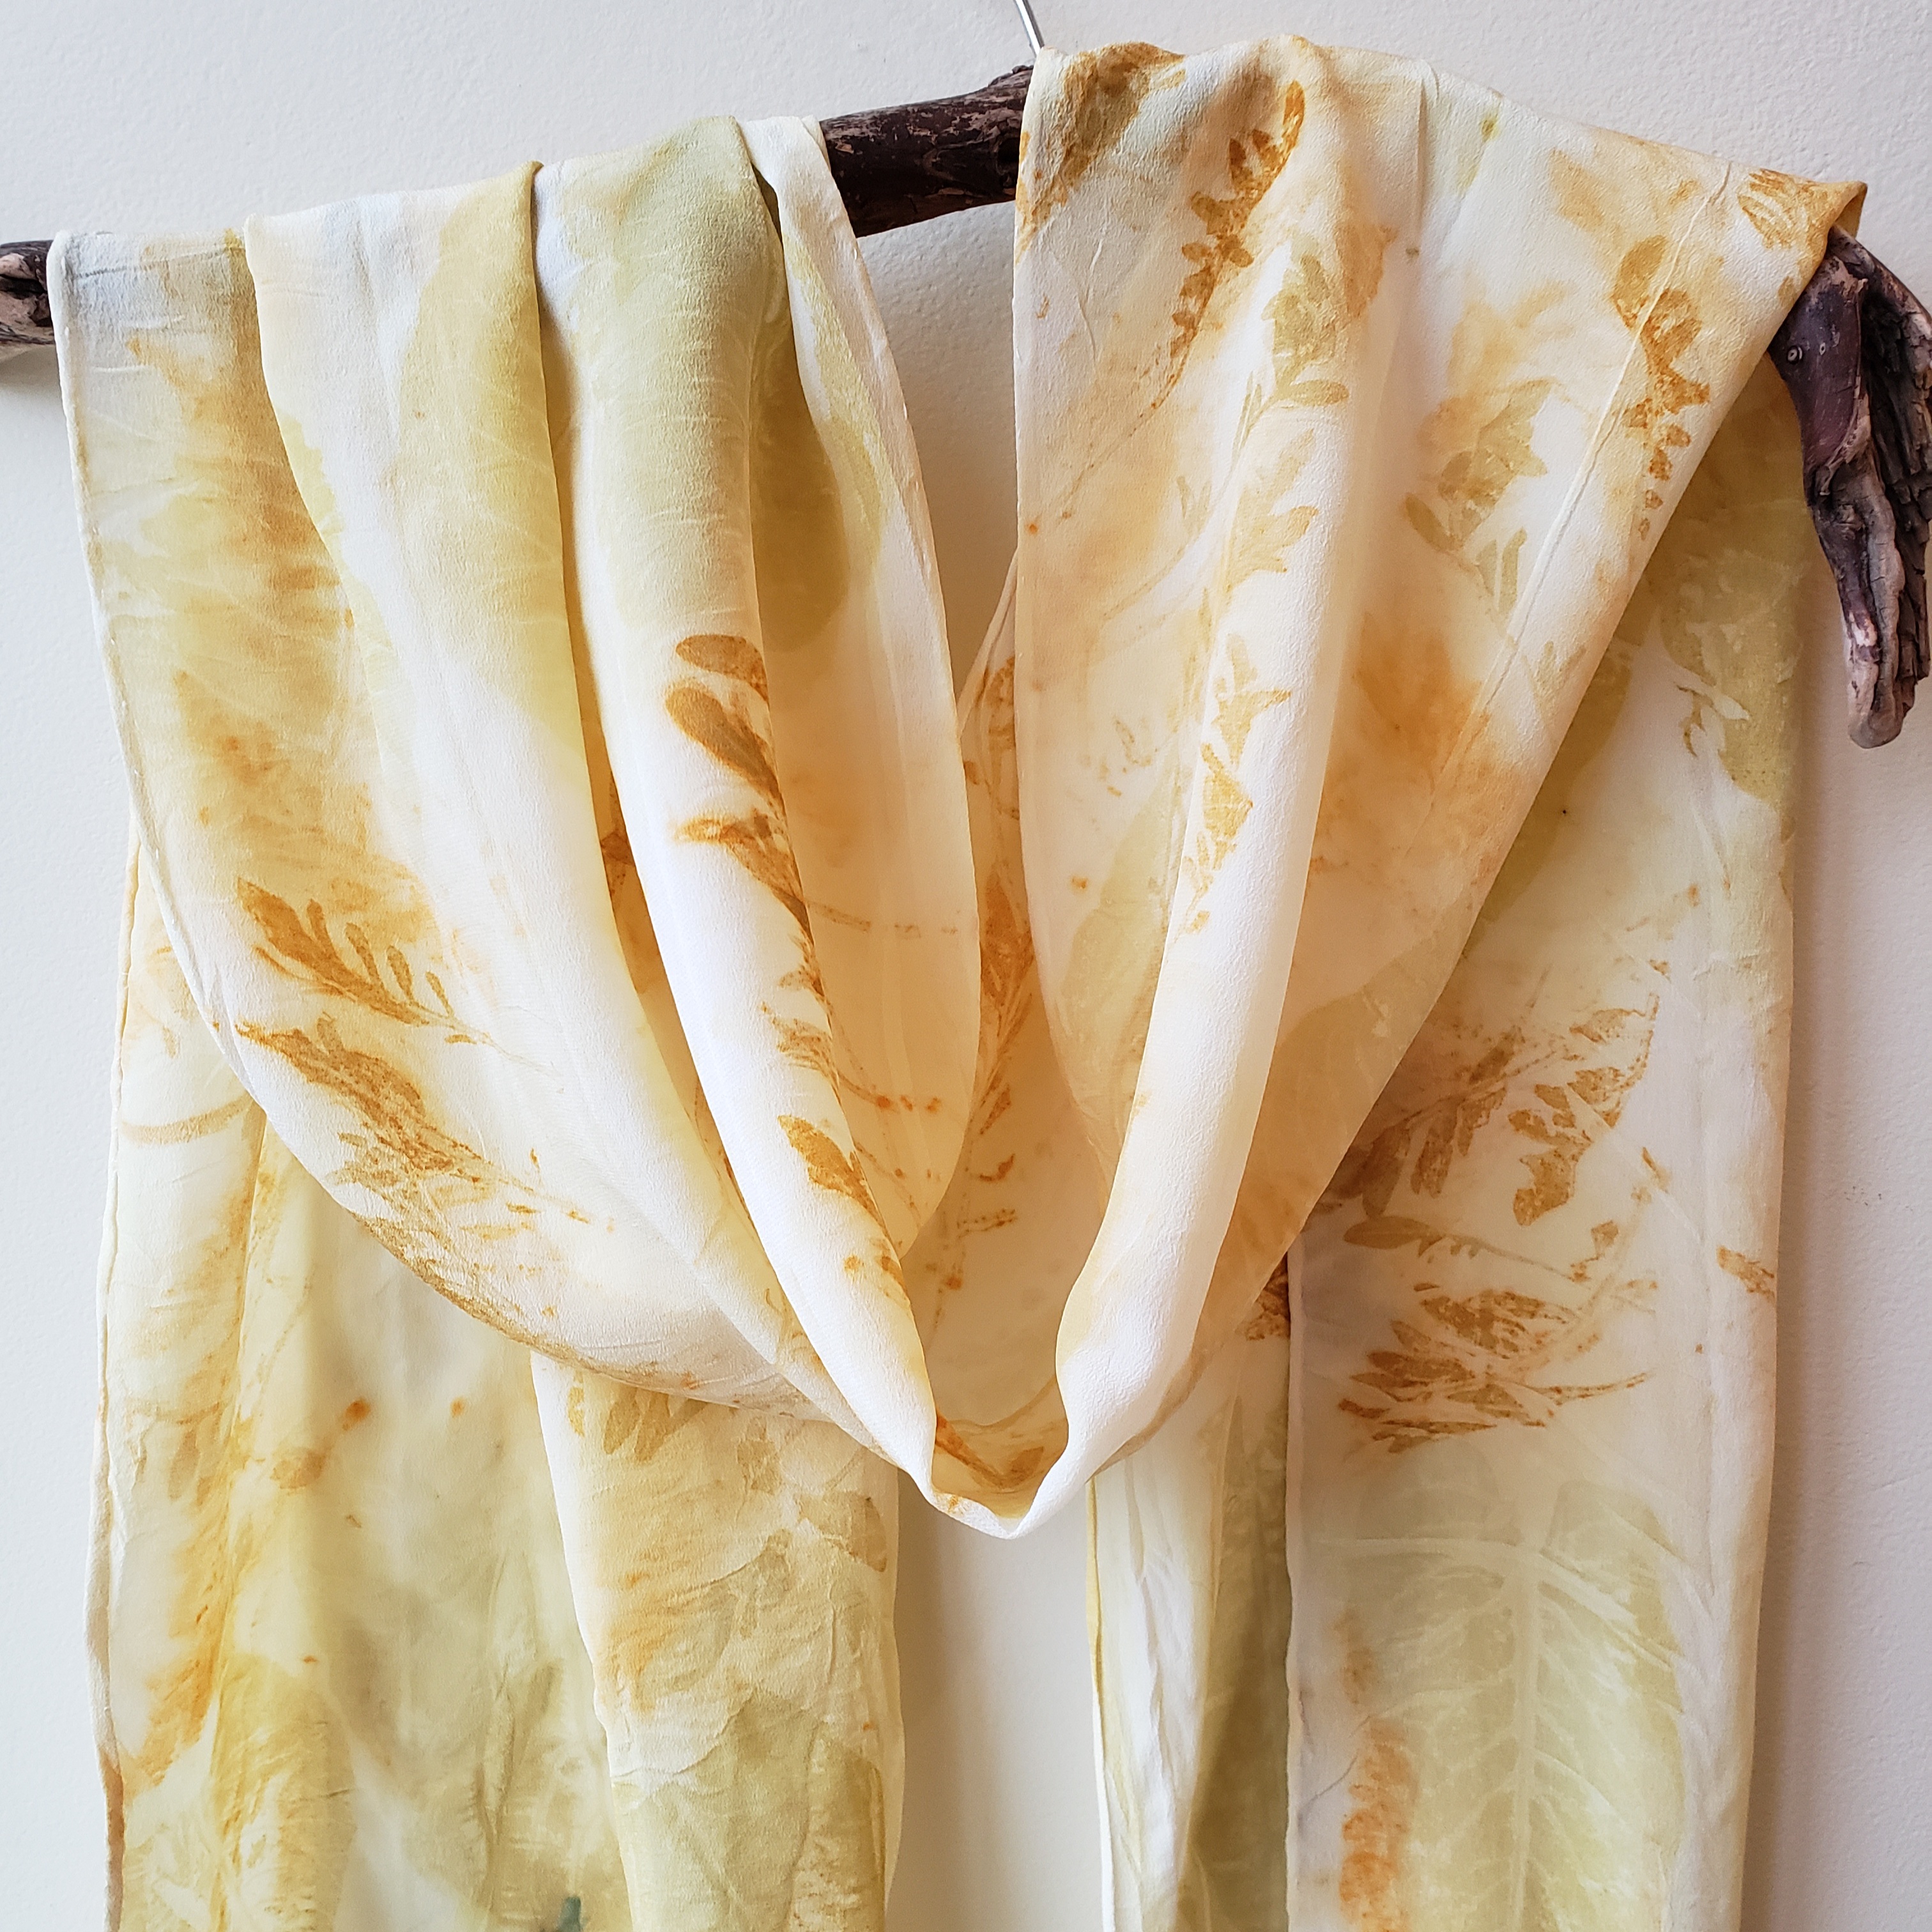
In the meantime, if I am going to be able to do fairs this spring and summer I do have to get work done, even though it is the dead of winter here and there isn't much fresh plant material to work with. I was asked for an interview with our local weekly paper, the Inlander, so that was another poke to get busy! They needed pictures to go with the article. I started with yellow onionskins on silk. This is a method with rusty nails as a co-effector that creates something that resembles an animal print. This was a way to have something colorful in the background of the photos as most of the prints with dried and pressed leaves give fainter color than when they were green leaves. They can be overdyed with other natural dyes, which is what will happen to the pieces I did as soon as we are just a tad warmer outside. Stomping around in the outdoor kitchen in 32 degrees Celsius is much better than the teens and twenties we are experiencing now.

 So, I am also spending sometime at the sewing machine making new ideas for what seems like a ton of eco printed fabric piling up around here. I guess in this case the execution mentioned above is coming before the vision and at some point it will all come together.

Bundles of yellow onion skins and rusted nails steaming in the outdoor kitchen, this can also be turned olive green with a post dip in an iron pot .

This one is on my Etsy shop. While I am taking a break from ceramics to create space both physically and mentally, I still have a lot of buttons and pendants to post, so keep checking!


Thursday, January 2, 2025

Happy New Year!

This could be filed under "Better Late than Never". I meant to put scarves in my Etsy shop for the holiday season, but then, after avoiding it like the plague for 4 years, I managed to contract covid. Perfect timing. Now, on the one hand, compared to what has gone on in the past, it seemed like a giant non-event for my husband and I. Neither of us got terribly sick. Just very, very tired. Really exhausted as a matter of fact.

So, here we are! I put up four scarves, but remember you can always hit the "message the seller" button and ask to see pictures of others. It helps if you pick a picture that is close, click on that one, then message the seller and tell me what about that particular one is close to what you want and I can go through what I have and take it from there. Hit this link to take you to the main page of my shop.


Sunday, May 1, 2022

Happy May Day!


 The flower for May (at least in my world anyway) is Arrowleaf Balsamroot (Balsamorhiza sagittata). It is a member of Asteraceae or the sunflower family. It grows throughout the American west and is very prolific here in Eastern Washington. It just started to bloom and I have found that if I wait a few weeks the prints are much more vibrant and clear. And so we wait. I don't use the flowers (although sometime I should at least give it a whirl on paper), just the leaves. The scarf below was mordanted with alum and the print is anything from pale green to bright yellow. With an iron or rust pre-mordant it would come out olive green. It would also be possible to dip the yellow results in an iron post dip and achieve olive green also. As mentioned, the plant is very prolific here, but as with all plants in the wild, I approach harvesting with caution and common sense. I go where there is a lot of it and only pick one or two leaves off several plants over a large area; and harvest in a different area each time.


The pale green leaf down in the corner is the arrowleaf balsamroot, the bright orange is its malcontented neighbor spotted knapweed. 

Wednesday, March 7, 2018

Tea Anyone?

Last winter I messed around with hibiscus tea, but didn't take enough notes to remember what I did or didn't do. So this time around I decided to take more pictures and notes. I laid out four scarves with various dry leaves and sprinkled the dry hibiscus tea around them. All scarves were treated with some sort of rust first.

As you can see, the leaf prints are pretty diffuse, but look at that pink!
This is just being washed in a cold water bath with a bit of shampoo.

As expected, most of the pink turned blue after various post treatments. Click on the picture to enlarge in order to really see the differences. Alas, no pink, or almost none, but an interesting selection of blues and lavenders. I personally like the one that was washed with no post treatment the best. When we get closer to summer, I may try this again with a scarf pretreated with alum instead of rust.

Sunday, October 8, 2017

Alum as an Adjunct

To be honest, I don't do much with alum in general as it seems to make silk a bit stiff. After steaming red cabbage either in an eco print or by itself I do give a post steam rinse with a small amount of alum in the water. This turns the cabbage from red-purple to some shade of blue. The red-purple seems to be fairly fugitive while the blue lasts. I maybe use a teaspoon in a gallon of water per scarf. This is a guesstimate as I am usually working on more than one scarf at a time.

I did a scarf with Himalayan Blackberry on a rusted steel wool pre-mordant. Nasty plant, wonderful print-isn't that always the way! I like the stark, hand drawn look of the prints with the purply "bleed" from the end of the stems.


When I have put them in with red cabbage they appear to go pink after the alum rinse. I thought it would be interesting to see what they looked like by themselves with the after rinse. I heated up some water and dissolved the alum powder in it, then let it cool off. I immersed the scarf and kept an eye on it for changes. After a few hours I decided it didn't look like it was changing any more so I took it out and let it dry. I gave it a rinse with shampoo the next day. I didn't add any alkaline to the alum water as the scarf was already exposed to salt as part of the rust mordant done before the steaming. How much difference a cream of tartar addition would make I am not sure. I used a teaspoon of alum in a gallon and a half of water. I decided if I was writing a post about it I should make note of the details. As you can see in the next picture, the prints stayed dark and the background turned a limey green.


The conclusion I came to is that the leaves themselves are bleeding or "dyeing" the background, similarly to what the cabbage does, but in this case in it isn't readily apparent until you expose it to the alum. I liked this, but liked it without just as well so I decided to do another scarf with blackberry so I would have one of each. This also allowed me to take a picture side by side so the difference is really clear. Also proving that this can be done over and over with the same result.


A note about working with Himalayan Blackberry, it has miserable thorns. Gloves are advised and although I have never had it make an actual hole in the fabric I do trim the ends of the thorns before placing the leaves. 

So, I guess the conclusion is that sometimes an after bath in a small amount of alum can bring out colors you didn't know were there. As to whether you like it or not is another matter altogether, so using scraps to experiment with might be a good call. I have done this to some things that I really didn't care for the outcome. The items in the print that changed color did so in a way that did not mesh with the rest of the printing. Knapweed, Arrowleaf Balsamroot and Artemisia Wormwood usually come out some shade of yellow when an alum pre-mordant is used, sage green with rust pre-mordant, so when mixed in with leaves that may have tannins etc it may be the influence of the other leaves that causes the after rinse to produce less than ideal results-kind of an indescribably ugly color somewhere between dirty yellow and a not good lime green.

Tuesday, January 26, 2016

Finally! A Day in the Studio

Some might be wondering about the rant regarding alligators the other day, sorry about that. It was a saying that my father kept on his office wall for as long as I can remember. It is a funny reminder to not get bogged down in the details that may or may not have anything to do with the final goal. The cooperative I am in, Pottery Place Plus, has been remodeling. Construction projects being what they are, there was a certain amount of frustration. Then there is being a group of creative types-everybody has an opinion. About everything. Sometimes you would think we were all theater majors; there is a lot of drama. But it is all done and it is beautiful! Here is my new space there:


So I finally got to work in the studio. Truth be told, my body decided to have some sort of minor but inconvenient stomach ailment I am sure was designed to make me stay home. Sometimes the universe works in not very mysterious ways. If you can't figure it out on your own, it finally says "Knock it off and take a rest!"


This is what I did with my sick day. Matching pendants I have made to lariat scarves is perfect for that kind of day. It isn't physically taxing and does allow ample time for trash TV and naps. It also is a wonderful reminder of summer days spent making the fabric for the lariats and fun at the clay studio Urban Art Co-op making the pendants. These lariats will be taken over to The Pottery Place and sorted out with the ones that are already there so I have a good color range there, for the art fairs and my Etsy shop.

Sunday, January 10, 2016

So....How Poisonous is Too Poisonous?


Well, you would think that one would be easy to answer, wouldn't you?

First off, the obvious ones, poison ivy (Toxicodendron radicans and T. rybegii) and poison oak (Toxicodendron pubescens and T. diversilobum). At first I thought about searching the web over for copyright free images, but decided against it. Both plants have an eastern and western version in the United States and since they are wild plants they are greatly affected by their growing conditions. So  trying to identify them from a picture of an ideal specimen could lead to tragedy.  The poison in both plants is so long lasting it survives even in the dead fall leaves and in the smoke if it is burned. So, needless to say (you would think) you should not make steam prints or dye with it. For a mind blowing story about people who decided to try it out anyway,  check out India Flint's blog post  about such things-YIKES! I have discovered here in Eastern Washington poison ivy seems to like to grow at the feet of Oregon Grape, why I wouldn't know, but it does. So, if I am picking up windfall leaves, I avoid raking anything out from under an Oregon Grape as Oregon Grape leaves don't work anyway and who knows what else might be lurking around under there. Last summer in Northern California I finally saw poison oak for the first time and it also likes to grow up, in and around other plants.

Fact is, every area of the country has poisonous plants both wild and in our gardens. It is really important that you know what they are. Knowing the scientific names helps, check out the ones above-"toxic" should give you a clue! Any name ending in Tinctoria or Tinctorium indicates a dye plant, but not necessarily that it is harmless.

 If you are the type of person that breaks out into hives just riding the lawn mower, this may not be the hobby for you. Many plants that do make color also have active ingredients that can give them medicinal properties, so anything that can help you can hurt you. Tansy, for instance makes yellow and green dye. It has been used as a medicinal tea but should only be used under the supervision of a trained herbalist as if consumed in large quantities it can cause convulsions and psychotic effects and is poisonous to grazing livestock and can poison the milk production from those animals. Rhubarb leaves contain oxalic acid, used both as a mordant and a cleaning agent, but is lethal to consume. Things like oleander, foxglove, hemlock and anemones are so poisonous they, like poison ivy and oak, should be avoided altogether. It is possible that what one person has a bad reaction to, another will not. A friend of mine was clearing scotch broom (also a known dye plant) from her yard and suffered anaphylaxis, making it to the emergency room just in time. She told me this after I had a bunch boiling away in a bundle; no harm seemed to come to me from it, however I think I will be more careful in the future-especially since the result from the steamed leaves was underwhelming.

The best advice I can offer is that if you are not an expert at plant identification it might be advisable to go on guided nature walks or take classes if possible. Park services, county extension services, garden clubs and other outdoor activities groups offer such things and they can be really informative as well as fun. Having a local park ranger point out what poison ivy looks like in your area is much more memorable than a picture. That being said having an actual guide book for your area along on a collecting trip can help you avoid danger. There are also weed apps for phones, but if you are out far enough, there may be no signal in order to be able to use it.  That, and not everything that is dangerous is considered a "weed". Old school is best in some cases. 

Using common sense when processing plants is invaluable. Wearing gloves while working with things you are unfamiliar with, keeping a dedicated set of tools for dyeing and doing all your cooking outside are good for a start. Remember that in some cases, nobody ever thought anybody would be cooking a particular plant to begin with, so no one knows what might be in the fumes, just make the assumption there might be something poisonous in the vapor and don't breath it in. The mordants you use can have issues as well, sometimes more so than the plants; wearing gloves can protect you from a lot of strife. Even things that are food stuffs can be problematic, my "roommate for life" has requested that I never cook cabbage for over an hour in the house ever again-he was coughing his brains out. After having to deal with cabbage scented sheets, curtains, rugs and blankets, it is a request I have no trouble complying with!

The long and short of it is, don't get a false sense of security from the words "natural" and "organic" there are plenty of naturally occurring dangerous organic substances in the world, it is up to us to use common sense in order to avoid trouble.

Wednesday, November 4, 2015

Artemisia Wormwood Dye


This plant makes a good steam print early in the spring and will make a yellow and green dye. Since the options for yellow are many, I like to turn it green. I start out by harvesting the artemisia. This is the wormwood of absinth fame. It also makes a great bug repellent. While I wouldn't rub it directly on my skin (any plant "active" enough to make a dye or have medicinal properties is also active enough to give you an allergic reaction) you can rub it on your boots and socks to chase away tiny critters trying to bite your ankles. The other handy thing about it is that it is considered a noxious weed in most states and nobody cares if you harvest it. It is quite abundant here in Eastern Washington. It grows in disturbed ground and has a much bigger leaf than our native artemisia, and also a potent sage smell.

I bring it home and chop it up, stems and all and put it in a neutral pot of water, big enough to hold whatever it is that I am dyeing that day. I simmer it for about an hour and then strain off the liquid. I put the liquid back in the neutral pot and then introduce silk fabric that has been pretreated with alum in the normal fashion. I let that simmer for about and hour and allow it to sit overnight. I remove it in the morning and rinse it out in clear water.


These were done just a few weeks ago and are more golden than the samples I did in the spring. Time of year probably made the difference. At this point I could either lay out some steel wool or rusted nails on it with a bit of vinegar water spray and let it sit overnight, or I could boil it in an iron pot for a bit and it turns green. Then I can use it to eco print with whatever makes a print with iron or rust.


The top photo is what it looked like after the nails had been removed and then the bottom image is after the eco print. The next two are finished items, the first a detail of a scarf that was boiled in an iron pot and the second the beaded infinity scarf made from the above samples.


Friday, October 30, 2015

Fifty Shades of Brown


I am always trying to find something to do with things there are plenty of, in this instance, horse chestnuts. They are everywhere in the fall and are something of a nuisance to home owners. I had done a bit last year and vaguely remember the swatches I did coming out kind of beige and were promptly used to eco print with no documentation as to how it all came out. This time, I separated the hulls from the nuts and let those soak for a couple of days. I was really hopeful when I spilled some transferring the soaked hulls to a cooking pot and it left a really kicky orange splash on the floor.


I cooked them for about an hour and then strained out the liquid into several pots. Since I already had dupioni swatches pretreated in various ways I decided to use those. Reading left to right, the first one was treated with soda ash, the second I poured the dye in my trusty iron pot, and the last was a pretreat with alum. The results were nice, but not kicky orange.


The next day or so, I was digging around on the internet and found a post on the February Twelve Blog where she got a really lovely brick red on wool. She added a bit of ammonia to the initial cooking liquid. I hadn't ever added ammonia to a dye bath and since it was a tiny amount and I just happened to have a tiny amount under the kitchen sink, I decided to try it. As you can see, no matter what the pre-mordant, I got pretty much the same color over and over. So much so I decided it was better to leave the plastic hangers in the picture so you could see they were actually different pieces of fabric. It could be it is just different on silk than wool, or that I let them soak or cook too long, or that the water here is really hard-who knows?


Never fear, I use this sort of thing as a first layer for other things. The top and bottom images are of the "browner" samples treated with iron-rusted nails and steel wool along with plant materials; the middle one is the sample that the dye had been cooked in an iron pot that I then eco printed with windfall leaves.


What to do with all these noodles of brown fabric? I call this a beaded infinity scarf, although it is more of a necklace. 


You may be wondering what happened to all the nuts that came out of these hulls. Well supposedly they make a soap with bleaching properties, although it sounds to me like it is more of a "bluing" if you know what that is. Anyway, the crucial ingredient is rain water instead of hard water, and rain water is something we have been short of. Today it is raining! A lot! So I put out a bucket and will hopefully have enough to make some soap.

Friday, October 9, 2015

Black Bean Dye

Since pictures of soaking horse chestnut hulls didn't sound too interesting I decided to post a do-over. People ask "What happens if they don't turn out right?" Well, then it is time for a do-over. I usually save these up in a pile and when I have that type of energy I get them out and ponder what to do with them. Some have tags that identify what I did to begin with, and this can be helpful when deciding what to do next. It is also good if I decide my do-over is something I would like to turn into an intentional process. (Now how did I screw that up to begin with???) One great solution is black bean dye. It is a cold water soaking dye, so no chance of losing what you already have to boiling in a new dye pot. Of course, depending how badly the item needs to be done over, you may want to lose the first effort! 


The first thing to do is determine if there is any alum in the scarf to begin with. If I did a pre-mordant with alum before eco printing I usually don't apply any more. In the case of the scarf in the big jar I used rusted nails as my mordant. It was a scarf I did while on the coast of Washington so I had used thimble berry and fern. This would be a great place to insert a picture of the original effort, if I had thought to take one-sorry! Anyway, while the thimbleberry was great, the fern, not so much. So as a scarf the design came out a bit too asymmetric, even by my standards. So I applied alum to the scarf, using the usual method for applying alum to silk. 

To make the dye I put a 1 pound bag of black beans to soak in about eight cups of cold water. As to the type, most black beans are packaged as a store brand and there is no way to know what the variety it is. Anyway, I have noticed some differences from store to store, but decided it wasn't worth stressing over. I let the beans soak for 24 hours. By that time the soaking water is murky and it is important not to let this set around any longer, it gets smelly fast. Using a strainer I pour the liquid into a larger vessel. It is important to not get too much of the sediment from the bottom in the soaking vat, it mucks up the dye vat and to my understanding can turn the color brown. I wet out the mordanted scarf and put it in the dye. I weight it down with a small plate, or you can do what I did in the second one and put it in a canning jar and just remember to flip it over periodically. Now it sets for 48 hours. Again, keep track of it, it smells bad enough after 48 hours, I can't imagine what would happen if it went longer than that. I remove the scarf from the vat, rinse it in clear water and hang it to dry. 

A note about that smell; remember that beans in general are notorious for growing botulism-that smell is a warning sign, so toss the beans, don't try to cook and eat them, wear gloves and keep your hands away from your face while doing this.

Eventually, it gets rinsed out with shampoo, hung to dry and ironed and it is ready to go. These are phone snaps and the color in real life is quite a bit darker than it seems here. I really like the way the original prints look like they are floating on water.


In the event you are wondering what was in the canning jar, it was a piece of silk crepe de chine I had done in Anacortes, but with alum as the mordant, so the prints came out a pale yellow, the operative word being pale. It is now a nice shade of blue and I will cut it up to make smaller scarves. Thanks for reading all the way to the end!

Wednesday, October 7, 2015

New Listings on Etsy


I got some stuff crossed off my list today and it feels good! Jet tub-cleaned! Floor-swept! Etsy listings-pictures taken and listed! Yeah! I put up some of my infinity scarves done in natural vat dyes. Tea, black beans, tansy (in both its yellow and green versions, thank you very much) and eucalyptus (in brown AND peach!) all went up for adoption today. I also added in some more of my ceramics work, chunky big raku beads suspended from distressed silk dupioni. AND I put it on Facebook AND I am now mentioning it here! Next I am going to Pin it as well.

Who is this strange marketer sitting at my desk and what did she do with the real me?

If you actually end up going to Etsy through the mini at the right hand side of this blog, please forgive any typos you may find there, after all this activity (or lack there of) my brain and my butt are both numb. I will go double check it tomorrow, right now it is time for a walk. When I get back maybe it will acceptably late enough in the day for a glass of wine!

Sunday, October 4, 2015

Summer into Fall

Wow! I can't believe how long it has been since I posted anything, time does fly! After the Anacortes show in early August I taught my first class in eco printing, it went well. Here are some pictures of us in action and the final results.


Then it was on to Sausalito California for a show over Labor Day weekend and two more shows here at home. In between I have been trying to make good use of the last of the summer greenery. The sunflower leaves are finally ready just as the locust are about done for the year. This scarf also includes pressed leaves from last year and marigolds that didn't get hit by our first frost. The marigolds will yield an olive green, the locust leaves a brighter green and the sunflower will print brown while the pressed leaves will be a purply black.
Now I am traipsing around collecting this years leaves as they change color. Mostly from the parks and yards as the wild trees have pretty much given up with all our hot dry weather this summer. Leaves from the small shrubs and trees I would normally collect and save just shriveled up, turned brown and fell to the ground. I know how they feel, I was at my load limit for heat, dust, smoke and no rain. I am not sure what it is about fall, but it must be the cooler temperatures and the bright blue skies that make this my favorite time of the year.

Wednesday, April 15, 2015

Jar Dyes

I decided  to put up some "witch jars" today. I call them that as sometimes the results  are magical - sometimes kind of scary! Anyway, these will set on the sunny side of the greenhouse  until I need something  to  steam print then I will take them out and work with them. About the only experiment  in these are privet  berries, they got really dried out, not sure what will happen!

Sunday, March 15, 2015

Rainy Sunday

Today was a good day. I got a lot done on the domestic front and managed  to accomplish  a few things  in  the  studio. The bust forms are done, did some dyeing  with red cabbage  and I got to open this up and see what happened. This is privet berries  with miscellaneous  dried leaves and rusty objects. Apparently  from what  I  have  read you can get blue or green  depending  on  the  mordant. Now I am watching  the  quail  clean up under the bird feeder, goodnight  all!

Wednesday, March 4, 2015

New Ceramic Accents

I have  had a lot  of  ideas for scarfflettes lately and have not been able to find the hardware I see in my head. Last fall I started taking ceramics  classes in an effort  to come up with the parts to complete the pieces. I am really happy with the results! Not only can I now make up  my own organic looking accents  but doing it in a community  setting allows me to meet other artists while  creating  these objects in an ecologically  responsible  way. When we share the expenses of running  a studio we also reduce the power usage needed to run a bunch of individual  kilns etc. I am really grateful for this experience!