Notions-Drye Goods Studio Diary

Thanks for checking in. I am a fiber artist. My current emphasis is on eco printing and other wildcraft with a touch of up-cycling thrown in. You can also catch up with me on Facebook at Drye Goods Studio.
Showing posts with label mordants. Show all posts

Sunday, March 12, 2023

Tea Time

 "A simple cup of tea is far from a simple matter."

Mary Lou Heiss

This turned into quite the project! I am still mulling over what exactly I will do with all this fabric, but in the meantime, here is what happened. As far as process goes, I let the various teas steep overnight and then used the liquid as a dye, vs. just dipping the fabric as one normally thinks of "tea dyeing". So I poured the liquid into a clean stainless steel pot, added enough water for the fabric to float freely and then simmered each one for about 30-40 minutes. All the silk broadcloth pieces for the herb teas were pretreated with alum. As you can see, the nettle did almost nothing, instead of green or yellow. This could be because it may not work as a dried plant, or it could be I didn't simmer it long enough.

These are the herbal teas, hibiscus, comfrey (after an iron dip), chamomile (the type for tea, not the dyer's chamomile, so the yellow was a nice surprise), St John's Wort, and the last was nettle. 

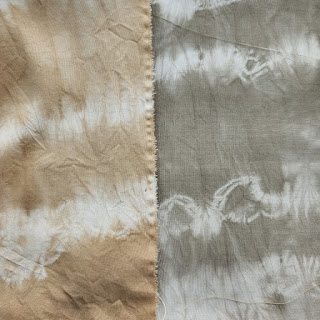
The picture above and the ones below are all with a very strong brew of plain old black tea that I steeped overnight and again used as dye, so they were simmered about 30-40 minutes. The pretreatment of alum didn't seem to make much of a difference color-wise, but may add to longevity. Since tea is high in tannins I am not sure it would make a difference one way or the other. The samples on the left of all these images are just as the silk broadcloth came out of the dye pot. The samples on the right are after a dip in iron water. I did this to give myself more color options, and just to see what would happen.


The fabric was rust treated with steel wool, so everywhere the tea interacted with the rust it turned black.

The fabric had rusted nails laid out on it first, and again, when the tea and rust meet, the rust turned black.

I am betwixt and between as to what to do with all this. I had better make up my mind soon as the pictures and info about the piece are due at the end of the month! I found it interesting that when I was just sitting there looking at the first results I could not see the herbal tea fabric being used with the black tea fabrics at all, but when I did the iron dip on the black tea fabrics (turning it gray) other possibilities emerged. This is kind of how my head works anyway, the process of doing things inspires me, I just wish I were a little speedier at it is all.

Sunday, May 1, 2022

Happy May Day!


 The flower for May (at least in my world anyway) is Arrowleaf Balsamroot (Balsamorhiza sagittata). It is a member of Asteraceae or the sunflower family. It grows throughout the American west and is very prolific here in Eastern Washington. It just started to bloom and I have found that if I wait a few weeks the prints are much more vibrant and clear. And so we wait. I don't use the flowers (although sometime I should at least give it a whirl on paper), just the leaves. The scarf below was mordanted with alum and the print is anything from pale green to bright yellow. With an iron or rust pre-mordant it would come out olive green. It would also be possible to dip the yellow results in an iron post dip and achieve olive green also. As mentioned, the plant is very prolific here, but as with all plants in the wild, I approach harvesting with caution and common sense. I go where there is a lot of it and only pick one or two leaves off several plants over a large area; and harvest in a different area each time.


The pale green leaf down in the corner is the arrowleaf balsamroot, the bright orange is its malcontented neighbor spotted knapweed. 

Sunday, March 14, 2021

ORANGE! (In a good way!)

 A few weeks ago I posted the start of an experiment with padauk sawdust my husband gave me-and here is the result!

The top is an overdye of an eco printed piece of silk crepe that I had done a "re-mordant" (is that a thing?) with alum; the next one down is silk twill that had a faint yellow dye on it (my guess would be tansy flower dye) to start with and thus some alum; the redish one is an overdye of an eco print on crepe with no additional mordant, just straight into the dye pot with it, and the vivid one at the bottom is another piece of silk twill that had an alum mordant applied. 


This is eco printed paper, front and back of the same piece. I have taken to keeping the "so-so" paper prints in a stack off to the side for "spent" dye baths. This particular paper was printed with poinsettia so the paper had alum applied before printing. I tossed it into the warmish padauk dye when I was all done and promptly forgot about it. So, imagine my surprise when I hauled the dye pot out to the compost pile and the last thing to come out of the pot was this piece of paper! It had sat in the dye so long it had sunk to the bottom.

I have another batch of sawdust soaking in vodka for another round of samples. This time I want to fiddle with the ph of the dye bath to see if I can get more of a red. Stay tuned!

Wednesday, September 2, 2020

Peeling Onions Part ll

 "Reality, it seems, is not a flat plane, but has as many veils as an onion has skins."

Johnny Rich, The Human Script

This is onion skin with no pre mordant laid out on silk dupioni. After laying out the onionskins and folding the fabric in thirds the long way, I put rusted nails about every 5 inches or so and then rolled the silk up jelly roll style. Then it was steamed for an hour and allowed to cool off. You can let it set longer for darker colors, but you run the risk of the rust "burning" the fabric. Everywhere the nails interact with onionskins, you end up with black stripes; almost an animal print!

Once the above procedure is done you can then dip the fabric in iron water-no heat applied in this case. It starts to change from orange to browns, greens and grays almost immediately, so keep an eye on it. I think this sample was about 30 minutes or so. You can either rinse it out at that point or let it dry on its own, keeping in mind it will continue to darken. Also remember that wet fabric appears about two shades darker than it will when it dries, so just gage from that how dark you want it to get.

Side by side-the tiger print and the jungle it lives in!

If you would like to see a real world application of this technique visit my page at the Pottery Place Plus Online Store.

Friday, August 28, 2020

Peeling Onions Part I

 "Life is an onion-you peel it year by year and sometimes weep."

Carl Sandburg 


We grow a lot of onions! We grow Candy Sweets as they are not readily available in stores and are really good. The dye material they are wrapped in is a bonus! We also grow a few red onions.

Just lay them out on the silk and roll them up. With no other plant material you end up with a kind of marbled effect. I used scraps of silk dupioni for these samples.

This with no mordant.

This is with an alum mordant.

This is red onion skin with an alum mordant. Love the shots of green!

Iron pot as a pre mordant, I filled the pot with water and a small touch of vinegar, heated it to boiling, shut off the heat, let it cool for an hour and then added the piece of silk. I let it soak for several hours. Then I rolled up the onionskins and steamed.

Here they are all laid out side by side. Normally I would just be adding crumbled onionskins around leaves, but I thought this was a good way to show different mordants and eventually I will use the fabric for various projects. The next post will show the effect of rusty objects as a co-mordant.

You can find my handmade supplies in my Etsy shop and scarves in the Pottery Place Plus online store.

Thursday, August 20, 2020

Experiments on Paper

 "When a path opens up before us that leads we know not where, don't be afraid to follow it. Our lives are meant to be mysterious journeys, unfolding one step at a time. Often we follow a path worn smooth by the many and in doing so we lose our authenticity, our individuality, our own unique expression. Do not be afraid to lose your way. Out of chaos, clarity will eventually rise. Out of not knowing, something new and unknown will ultimately come. Do not order things too swiftly. Wait and the miracle will appear."

Ann Mortifee


This is a print from the leaves of the pincushion flower. Left to right; watercolor paper soaked in iron water, watercolor paper soaked in alum, and the third is watercolor paper soaked in copper-love the red! If you click on the picture and look closely, you might also see the creepy little face at the top of that print! The first two were steamed in a stack of paper that I alternated the paper soaked in iron water with the paper soaked in alum, so the leaf in between was affected by both. In the case of the alum paper the print is a more golden yellow. Normally with just alum by itself it would be a bright lemon yellow-both nice, but it is good to have options!


Monday, April 6, 2020

The Owl

"The owl," he was saying, "is one of the most curious creatures. A bird that stays awake when the rest of the world sleeps. They can see in the dark. I find that so interesting, to be mired in reality when the rest of the world is dreaming. What does he see and what does he know that the rest of the world is missing?"
MJ Rose, Seduction Series

At night, before bed, I go out and check on the world. To see if it's cloudy, if I can see the stars, whatever. A week or so ago a huge black shape swooped across the yard and landed in the pear tree. It was the neighborhood owl. Another bird, one that probably was roosting in the tree for the night, took off with a squawk into the dark. The next day I was working on a collage for an online group and just happened to come across an image of an owl and ended up making this one as well.
Since the original plan was to offer classes in April about how to prepare fabric for the coming summer the next post will be about working with rusty objects as a mordant. I just have one more procedure to do and take some more pictures. I hope you and all you know are well, or as well as can be expected under the circumstances. A friend posted on Facebook about using the time to ponder what parts of "normal" could we personally live without and should leave behind when this is all over. I think this is wise. After several really frustrating weeks, I suddenly realized that this situation is telling me something and that there are certain things I am not wrong about and it is futile to try to fit myself into situations that are just completely unnatural, and in some cases downright harmful, for me. The owl does what it needs to do in order to survive, and  so should all of us.

Remember to check out my Etsy site, new things go in almost everyday.

Friday, October 4, 2019

New Weed

And no, I am not trying to increase my SEO (search engine optimization) with that title-although it did cross my mind. Any-hoo, I thought I would show you my results using Watson's Willowherb.

This is what it looks like, sorry it is not the greatest picture, by the time I decided to try the plant it was at the end of its season. Those long curly things are the seed pods.

I decided to throw it in a stack of paper. I was alternating sheets soaked in iron with sheets soaked in alum. I do like the burgundy red with the mint green and I was really excited to see the wispy seed pods printed too.

Of course, I had to see what would happen on fabric so I went scrounging around in the weediest garden border on the north side of the yard and lucked out-there was some hiding behind the sour cherry tree! Since it worked really well with the iron/alum combo on paper I decided to do the same with fabric. This is silk crepe de chine pretreated with alum using an iron blanket.

And this is the iron blanket! I was so surprised this printed so well.
Be sure to check out my Etsy shop, there are lots of new things and I have been restocking the old. 

Friday, August 30, 2019

And Now We Wait

I taught a class last weekend and while I was gathering plant material I grabbed a couple of "experimental" ones. Meaning, either by some miracle I had never tried them, or, I did and couldn't remember whether they worked or not. I like to include an unknown as I think it gives students the "permission" to go out and take a chance on something. It is not the end of the world if it doesn't print; and then I remind them that just because it didn't work with the mordant we are using, or at the time of year the plant was picked doesn't mean that it wouldn't print under other circumstances.

We are living in a jungle of  flea bane (Conyza canadensis), also known as Horseweed as supposedly it is irritating to horses. There doesn't seem to be a consensus as to whether it actually repels fleas, but our dogs never had any!
Conyza canadensis, also known as flea bane or horseweed with antique tractor.
I simply love it when I find something that is everywhere, in the way, and generally making a nuisance of itself, prints. In this case it is a member of the sunflower family, so it does make sense that it printed yellow or green.

On paper. On the left the paper was soaked in alum water and the flea bane was soaked in iron water. On the right the paper was soaked in alum water and the plant material used as is.


Top photo silk crepe de chine pretreated with alum plant material used as picked. Middle photo silk crepe treated with alum, plant material soaked in iron water. Bottom photo silk twill soaked in iron water, plant material used as is. Be sure to click on the pictures to enlarge them in order to see the details.
   Since it is a member of the sunflower family and it "should" do this I have no reason to believe the paper would change much over time. Fabric can be a different ballgame so I will leave it hang on my studio closet doors until next spring to see what happens to it. Once the out of control grapevine has been put back in its place for the year that wall will get moderate morning sun through the windows until we really hit the depths of winter so that is a pretty good test on "wearability". I will wash it out then and see what it looks like.

Side by side comparison

Remember to take a look at my Etsy Shop, Facebook page and Instagram

Wednesday, June 26, 2019

Summer Colors

"Art is lunging forward without certainty about where you are going or how to get there, being open to and dependant on what luck, the paint, the typo, the dissonance, give you. Without art you're stuck with yourself as you are and life as you think life is."
Mark Vonnegut M.D. 

Coreopsis foliage with pre-applied rust mordant.

The orange is the coreopsis, again just the foliage, on silk with alum mordant.

Here is the plant, the flowers also print well.

Friday, February 22, 2019

Results of the Steamer Pot Picture

I posted this picture on Drye Goods Studio Facebook page the other day and it got some attention along with people asking to see results because of the foil liner. It functions as a barrier, but in a small way as a mordant blanket. I have done this before and have gotten zingier colors, but maybe that was because I was using fresh plant material, this was all done with dry leaves.


So here you go:

Vine Maple, the yellow is the "ghost" from the top of the leaf, the darker print is from the underside or veined side.


A side by side comparison of oak with and with foil barriers. The one on the left is without; the prints are a brown/plum and the background has more "noise" in it. The one on the right is a different shade of brown and the background is cleaner.

Acer Rubrum 

Dogwood
Not sure about the yellow and brown as a color combo, I may do something else with them while staring out the window watching the snow pile up.

Thursday, February 7, 2019

Winter Fun

Sometimes you just need to take something one step further, for whatever reason. Winter is a great time for eco printers to catch up on stuff like that. You may have things set aside that didn't turn out all that great, or are not what you expected. It could also be that while something is a perfectly acceptable piece of fabric, it isn't the color that you need at the moment.


I picked these two pieces to do over. The one on the left is silk charmeuse, and while a nice print, there isn't enough contrast between it and the other things I would like to go with it. The one on the right is an experiment with only the green leaves of Poinsettia. In this picture it looks a lot better than it does in real life. It came out very pale and then there are the hinky black spots.


You have some options; you could mix up some sort of dye and over dye the whole thing, or you could just eco print over what you already did-sometimes those turn out fantastic, or you can expose it to another mordant or adjunct. In this case I am using the iron pot as the post mordant or adjunct. I wanted the charmeuse piece to be darker, more gray and in the case of the yellow nightmare-anything has to be better than that, so into the iron pot they went. First I filled this cast iron dutch oven with water and a splash of vinegar and brought that to a boil and then hauled it back inside to cool off. I was afraid if I left out on the gas stove to cool I would forget it and it would freeze solid in this lovely polar vortex we are having. Once the water was tepid I dumped in both pieces of fabric. Then I went off to do something else, but I set the timer on my phone for about 15 minutes so I would remember to go back, give the fabric a stir and check to see what was happening. 

The first time around there wasn't much going on but as the afternoon progressed both pieces got darker. I was really hoping the yellow one would turn green as it sometimes does with this treatment, but as you will see in the pictures below, it came out kind of gray. There isn't an exact procedure for this process, when you think it is dark enough, take it out. Remember that wet fabric appears about two shades darker than when it is dry, so take that into consideration. Depending on the plant material, it is possible to turn something totally black, so if that isn't what you are after-check it often.

This is the one that was yellow. I like it and may leave it that way, but I could eco print on top of it. I may just let it sit around a bit to ponder if it is done or not.

This is the charmeuse piece, the background is grayed out and some of the leaf prints are more defined.
If you are wondering why I took the second set of pictures against a canvas background it is because I had a bear of a time getting the colors right in the photos. I let the phone update last night-and no Samsung, I am not at all happy with the updates to the camera!! It was very difficult to get true color, especially with the shiny charmeuse, so about the only way to get you to see what I see (and not have to troop out into the aforementioned polar vortex to take pictures) was to lay both pieces against the white, it must make the camera "see" differently or something. No amount of messing around with the settings would fix it. Anyway, the background came out a lovely blue-gray and will look great with the other two pieces of fabric I am using.

Thursday, November 1, 2018

Rainbow Colors

Silk cocoons are where silk thread comes from. Believe it or not, about one mile of silk thread comes from one of these little cocoons. There are many videos that show how this is done, since I am never sure about the whole "cookie" warning thing, I will leave you to explore that on your own.

I am going to use them to make tassels for journals and didn't want to go through a giant hassle to get colors that would "match" the fabric covers for the journals so the first challenge was to use what I had around in the way of dye stuffs. I had some red wine, tea bags, walnut dye that was already made up, and for this purpose tansy dye is no big deal to whip up in a flash. I say "for this purpose" as these will never be wet or washed, so while the picture does explain a bit about pre-mordants and adjuncts not all of this would be applicable to dyeing fabric. While I did enlarge the image, it will probably be helpful to click on it in order to read the labels.

I gave them a quick soak in a weak alum solution I had already, I did warm it up a bit and let them sit for a half hour or so. Then I soaked all but the walnut for about a half hour in the dye bath and then gave some of them a very quick dip in my rusted water jar and set them to dry. Walnut is so dark already that dipping it in rusted water seemed redundant. I found it interesting that the black tea turned black when exposed to the iron in the water. It is the reaction of the tannins in the tea that caused this.
The color in the top picture is more accurate, but I do love playing with the filters on the phone!
The journals will eventually end up in Pottery Place Plus, they are mini versions of the binder type art journals I have done in the past, give me a week or so to get them in the shop.

Thursday, October 11, 2018

Banishing Ghosts

Normally, I like the look of eco prints all mixed together. It reminds me of the way nature really is. The fabric reflects flowers floating in a mixture of foliage in the garden or individual leaves that pop out from the visual mass of the tree. Sometimes however, the pattern of the individual leaf becomes the most important thing. In this case I am working on lampshades and other lighting ideas and so a clear background becomes important so that the light shines through the individual leaf print. In order for the leaves in one layer to not "ghost" through to another layer a barrier must be used. This leads to a fairly controversial topic-barriers. The controversy stems from the fact that the name most people use for this process is "eco printing"; meaning ecologically sustainable or sound. So, there seems to be something inherently wrong about using plastic sheeting, a petroleum product. The problem lies in the manufacture of the plastic itself and then there is the whole notion of steaming or boiling it.  It will put off fumes that you may or may not be able to smell, possibly creating a danger to yourself. Also, there is probably no way to get the petroleum molecules off whatever your finished product is, thus making it possible, in theory, to have the petroleum seep into your skin from the finished wearable. I don't want to get into the middle of the fruckus, but I do wonder if some of my nasal issues are from making those hair flowers using melted polyester-so I chose to avoid use of plastics whenever possible from here on out.

Hollyhock, Filbert, and Coreopsis, along with plenty of "ghosts".
So, what could be used instead? Since I already did a post about using layers of fabric in between the folds, I thought I would work with some aluminum foil. Trouble is, I get so into things when I am doing them I forget to take pictures. Earlier this week I decided to just set up some "stunt" fabric to show the steps clearly rather than a hodge podge of unrelated pictures. First off, imagine the fabric in the pictures is wet. It is silk dupioni with rusted steel wool as mordant.

Lay out plant material, remember that most leaves print out the under or veined side of the leaf.

Cover with foil. At first I thought cheap dollar store foil would be fine, but decided that heavy duty could be reused or refolded and was easier to work with without tearing it.

Fold over one layer of fabric, in this case I am working in thirds as I want the pattern straight down the middle of the fabric. Ponder what you want as your final effect and fold/layer accordingly. In this case I will just fold over the right side and proceed to the next picture.


Put on the last layer of foil. If you don't, you will have the ghosts of the leaves down the the last layer of the fabric in the bundle. Roll around a stick and tie it up for the steamer pot.
Ready to go!
As I said this was stunt fabric. The following is one of the actual examples I made, and then didn't take enough process shots for it to make any sense. This is silk noil with steel wool as the mordant, using black walnut leaves and marigold petals on both pieces. Raw silk is thick enough that you don't get as much ghosting anyway, but there is a definite difference in the background color and density. 

With no barrier layers

With a foil barrier. The background is clearer and the color of the walnut leaves more intense.
One important thing to remember is that aluminum foil will act as a mordant carrier blanket. It isn't terribly noticeable but you do get different colors than you would without. I am playing around with the whole carrier blanket thing and will post more about that later. The foil is mostly reusable if you get the wet plant material off right away and it can be refolded with the clean side out for reuse. Foil is kind of expensive but it is more effective than multiple layers of fabric. The interesting thing about using multiple layers of fabric is you get that fabric to use for something else.
Decisions, decisions.